The humble valve cover gasket does an outsized job: it keeps engine oil inside your cylinder head while sealing out dirt and moisture. When it fails, messy leaks, burning smells, and even misfires can follow. Whether you’re a DIYer tackling weekend maintenance or a shop tech streamlining routine service, understanding how this seal works, why it fails, and how to replace it correctly is essential to keeping engines clean, efficient, and reliable.
What a Valve Cover Gasket Does—and Why It Leaks
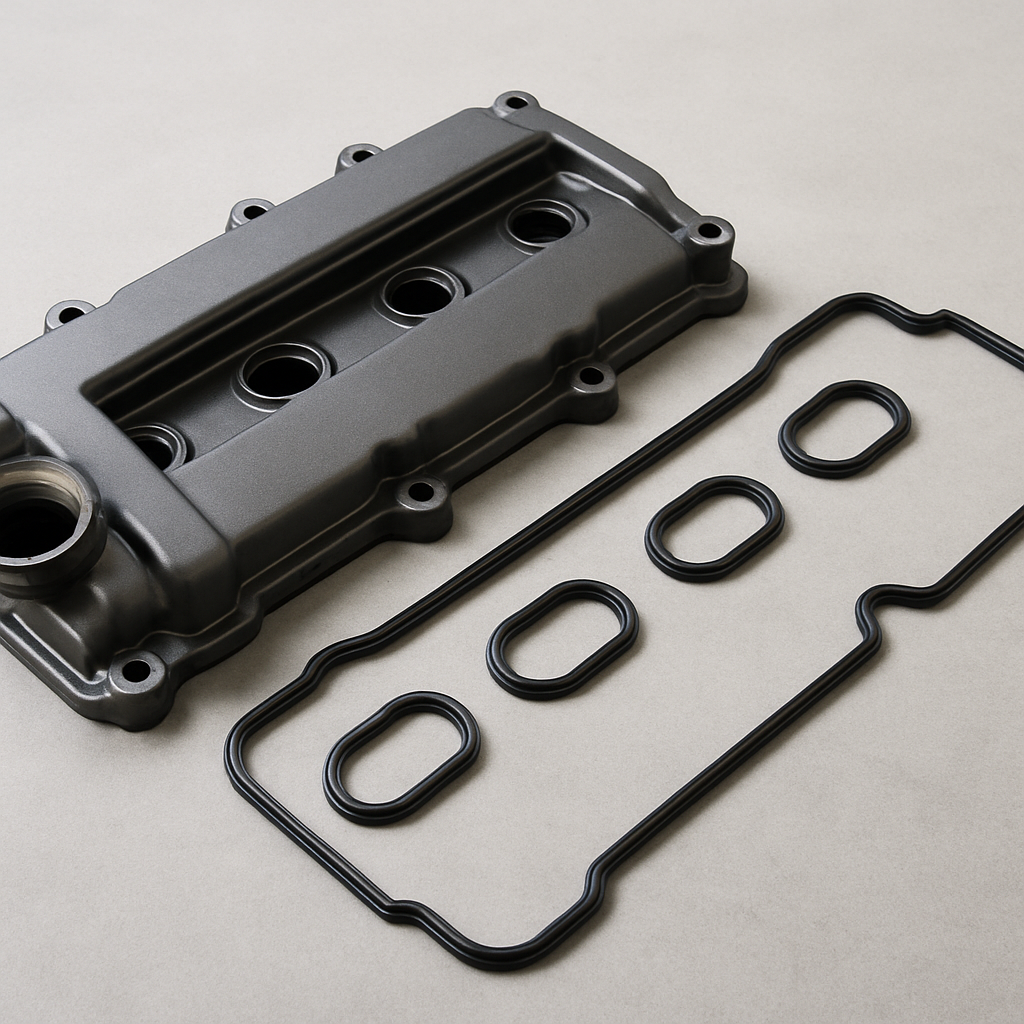
Sitting at the top of the engine, the valve cover shields valvetrain components—camshafts, rockers, lifters—from contamination while allowing oil to circulate for lubrication and cooling. The valve cover gasket forms the oil-tight barrier between the cover and the cylinder head. On many modern engines, the cover also routes crankcase ventilation and houses ignition coil mounts, so a healthy seal supports both lubrication and proper crankcase pressure control.
Materials vary, and each has its strengths. Cork was common on older engines because it compresses well but can dry out and shrink. Molded rubber or silicone gaskets are now the norm, offering better heat resistance and durability. Some applications integrate spark plug tube seals and grommets, or require extra sealing “half-moons” at the back of the head. Aluminum and magnesium covers demand especially careful torque and surface prep, because they’re more sensitive to warping than stamped steel covers.
Why do these gaskets fail? Heat cycles harden and flatten them over time. Small cover distortions from over-tightening can create leak paths. A clogged PCV system raises crankcase pressure and forces oil past otherwise decent seals. Old grommets on cover bolts lose clamping force and contribute to weeping at bolt holes. Improper sealant use—too much, too little, or applied in the wrong areas—can also lead to seepage or contamination inside the engine.
The signs are hard to ignore. You may notice a sweet, burnt-oil odor after a drive, a film of oil around the cover perimeter, or dampness where the head meets the timing cover. Oil dripping onto a hot exhaust manifold can produce smoke. On coil-on-plug engines, oil inside spark plug tubes can trigger misfires, rough idle, or hard starts. Over time, persistent leaks attract dust and debris, forming sludge that traps heat and can degrade plastic connectors and hoses. Beyond mess and smell, chronic leaks can lower oil level, risk premature catalytic converter damage from burned oil, and even create a minor fire hazard if oil saturates exhaust components.
How to Diagnose and Replace a Valve Cover Gasket Like a Pro
Accurate diagnosis starts clean. Degrease the area, drive briefly, and re-inspect. Trace the highest, freshest point of wetness. If the seam around the cover is wet, suspect the gasket. If the front corner where the head meets the timing cover seeps, the cure often includes adding a dab of RTV at that junction during reassembly. For uncertain cases, a UV dye and black light can confirm the source. Differentiate from camshaft seal leaks (which wet the timing area) or a head gasket leak (which typically shows coolant or compression symptoms, not just oil at the cover seam). Also inspect the PCV valve and related hoses; excessive crankcase pressure will sabotage any new seal.
Plan the job with the right parts and tools. At minimum, you’ll want a new valve cover gasket, any required spark plug tube seals, fresh bolt grommets, a small tube of sensor-safe RTV for specified corners, a torque wrench, solvent and lint-free rags, and a plastic scraper. Have replacement breather hoses or a PCV valve on hand if they look brittle or clogged. If ignition coils or plug wires sit above the cover, budget time to replace worn boots or plugs while you’re there.
Disassembly is straightforward but benefits from order. Label hoses and connectors. Remove engine covers, intake ducts, and ignition components as needed. Loosen cover bolts in a reverse-cross pattern to reduce stress. Once off, avoid gouging the head or cover—use plastic tools and solvent to remove old gasket and RTV. Check the cover’s sealing rail with a straightedge; if it’s warped or the bolt posts are crushed, replacement may be wiser than forcing a new gasket to do impossible work.
Reassembly is where many leaks are prevented—or created. Dry-fit the new gasket in the cover, ensuring it sits fully in the groove. Apply a pea-sized dab of RTV only where the factory specifies—usually at timing cover joints or half-moon plugs—not along the entire perimeter. Install the cover carefully without pinching the gasket or snagging harnesses. Hand-start all bolts, then torque in a spiral cross pattern to the factory specification. These specs are modest—often in the single-digit ft-lb range—so a small torque wrench is your friend. Replace aged grommets to restore even clamping force. Reconnect everything, allow any RTV to skin over per instructions, and then start the engine to check for seepage. After a short drive, recheck for fresh oil and verify the PCV system draws a gentle vacuum at idle. Skipping PCV service is a common cause of repeat leaks.
A few pitfalls to avoid: over-tightening (which bows the cover and squeezes the gasket unevenly), slathering RTV everywhere (which can break off and clog oil passages), mixing bolt lengths, and reusing flattened grommets. Take photos during disassembly if routing looks complex, and keep debris out of the head at all costs. A methodical approach transforms this repair from messy guesswork into a clean, durable fix.
Choosing the Right Gasket and Buying Smart for Reliable Results
Fit and material matter as much as the installation. For daily drivers and most light-duty engines, molded rubber or silicone gaskets are the gold standard—they compress evenly, resist heat, and maintain sealing force over many cycles. Cork or composite options can work on older, low-heat applications but demand precise torque and more frequent checks. Performance or turbocharged engines benefit from higher-temp materials and robust integrated tube seals. Aluminum covers appreciate pliable gaskets that accommodate minor expansion differences without requiring heroic clamping force.
Look for kits that mirror the OEM configuration. If your engine uses spark plug tube seals, half-moon plugs, or specified corner sealant, a comprehensive kit saves time and return trips. Don’t overlook bolt grommets; their rubber cores degrade and are critical to consistent compression. If you discover a warped or cracked cover—common on some plastic and magnesium designs—replacing the cover and gasket together is often the only lasting solution.
Compatibility details make or break your purchase. Shop by year, make, model, and engine code, and verify photos against your existing parts. Notes like “with VVT,” “magnesium cover,” or “round vs. square tube seals” are there for a reason. If you’re refreshing ignition components, bundling coil boots or spark plugs with the gasket kit is cost-effective and prevents future teardowns. Online marketplaces that specialize in repair components help consolidate everything you need—fasteners, PCV valves, breather hoses, and sealants—so you can complete the job in one session. When you’re ready to buy, it’s easy to find a quality valve cover gasket along with the related hardware, tools, and accessories to finish the repair confidently.
Budgeting is straightforward. Parts typically range from modest to mid-tier depending on material and whether you need a full kit. Labor time varies by engine layout—compact transverse engines with layered intake plumbing can take longer—expect roughly an hour on simple layouts to a few hours on complex ones. DIYers with basic tools and patience can tackle most applications. Small repair shops can turn these jobs into reliable, repeatable service by standardizing torque procedures, stocking common PCV components, and educating customers on signs of leaks before they escalate.
Consider two real-world scenarios. A home mechanic notices a burnt-oil smell and light smoke from the passenger side after highway drives. Inspection reveals oil pooling at the rear timing corner. The fix includes a new molded rubber gasket, fresh bolt grommets, and a tiny RTV bead at the timing cover junction. The smell disappears, and the engine bay stays clean. In a second case, a fleet vehicle returns with a repeat leak two months after a quick gasket swap. Root cause: a plugged PCV valve causing pressure spikes. Replacing the PCV system, installing a high-temp gasket set, and torquing correctly ends the cycle of seepage. In both cases, success combines the right parts, sound diagnosis, and disciplined installation.
Finally, protect your work. Keep surfaces pristine, follow the torque sequence, and resist the urge to “snug it more.” After installation, monitor for a few heat cycles, recheck for any signs of dampness, and verify that the crankcase ventilation is healthy. With the correct gasket, thoughtful prep, and a light but precise hand on the fasteners, your engine will reward you with a dry, odor-free, and dependable top end.
Muscat biotech researcher now nomadding through Buenos Aires. Yara blogs on CRISPR crops, tango etiquette, and password-manager best practices. She practices Arabic calligraphy on recycled tango sheet music—performance art meets penmanship.


Leave a Reply